Showing posts with label craft. Show all posts

Friday, January 18, 2008

Isn't this CUTE?!?!?!?


Hi, everyone! This is going to be pretty quick again - I have a workshop here this afternoon, and I'll show you those projects on Tuesday, after we've done them at my Monday workshop, too. :) Both of these are hostess club workshops, so one of the projects is a little more detailed for them. It's cute! :D
Anyway. This is the hostess gift for each hostess. I LOVE HOW EASY THIS WAS!
I picked up this little bucket at an after-Christmas sale for a few pennies. The Crop-A-Dile punched the holes for the ribbon AS EASILY AS THROUGH CARD STOCK!!! It was AMAZING!!!!!! Of course, that's our red gingham ribbon. Just a bit of whimsy. :)
The wording is our new CHERISHED MEMORIES RUB-ONS. They are SOOOOOOOO easy to use, stick down quickly, and are really classy. It's much easier than trying to stamp on the bucket. ;)
So, tell me what you think - then take the time to STAMP something!!! :) Have a wonderful weekend!

Saturday, August 11, 2007

Don't get spoiled by my posting every day! LOL!


I'm actually procrastinating, so YOU get another sample. LOL!!!! I really need to do some design work today, and I'm just not feeling it.

ANYWAY. Last night was our craft night at church; I got a lot done, but not as much as I wanted to! It's so nice to get together with a group of my friends and do what I love to do!

Now, then. This card is another sample from my chipboard class on Tuesday. It's so sparkly, I love it!We took the chipboard piece, and covered it in Cameo Coral CRAFT ink, then Holographic Highlights embossing powder. We heated and melted it, then punched the holes using my Crop-A-Dile. (May I say, I LOVE this tool?? Cuts like "buttah". :D) Threaded the new vanilla taffeta ribbon through those little holes, put in brads, and finished the rest of the card. It's a great look - I did Amy's birthday card like this, and used an A for the letter. :)

Well, I guess there's no getting around it. It's time to get to work. I need to go STAMP something - I hope you take some time today to do so, too! :)

Sunday, July 29, 2007

Another Christmas In July Stamp Camp Project :)


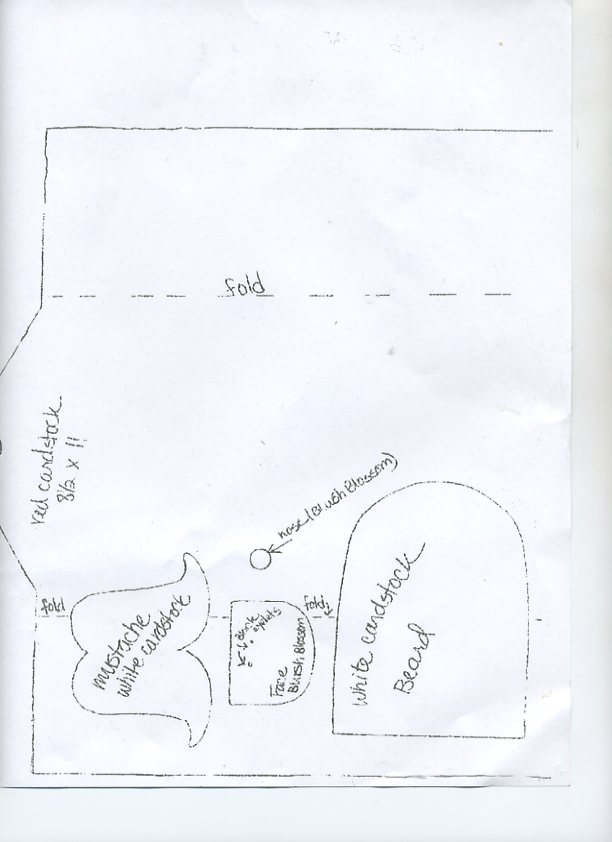
Isn't he CUTE?? ) This is from a template a friend sent me several years ago; we did him as a project at my first Christmas stamp camp here in the Nashville area almost three years ago, but Thursday's group was all new since then, so I decided to do him again. We used new stamps, of course, to embellish - but nothing else has changed. :) You can find a .jpg of the template at http://members.tripod.com/pooh0612/Santa_pattern.jpg; if you print the picture, it will give you the thing at about 80%. Try enlarging it until it fills your paper; the red piece ends up being just about 9 inches long. If you have questions, just email me. :) I'm going to do some of these for a craft fair, too, and some for Christmas gifts. They're just too fun for words!! :) Card stock is Real Red, Whisper White, Basic Black ("belt" buckle), and Blush Blossom. The eyes are black eyelets, set with the Crop-A-Dile - LOVING this tool!!. The nose is simply a 1/4" circle punched out. The belt itself is Basic Black grosgrain ribbon. The hat and "belt buckle" stamps are from the Level 2 hostess set PERFECT PRESENTATION - I just HAD to have it. :) I love Christmas! The bottom and the back seam are sealed with Sticky Strip.
Is anyone else at that point today where you're given ALL you've got, and if ONE MORE PERSON asks you for ONE MORE THING, you're gonna scream?!?!?!? :D I think I need a nap - so off I go. OH, I've changed the comments section now so that you don't have to be a Google member to leave me a comment - didn't realize I'd left that on, so I'm sorry. PLEASE do go leave me a message now! :D
Take some time to STAMP SOMETHING TODAY!!! And share with ME! :)

Saturday, July 28, 2007

Here's another project from the Christmas In July Stamp Camp!


OK, so I now know I have to have this stamp set. I borrowed it from my downline and dear friend - HAPPY BIRTHDAY, MELISSA!!!!!! - and now plan to purchase it next month. :) I'm going to do sets of these to sell at a craft fair in October, so I need to get going NOW - I'm such a bad procrastinator. :)
So, they're stamped with black Staz-on, then baked for 20 minutes and cooled. We colored them with Stampin' Pastels and blender pens, then lightly coated them with Krylon Fixatif. Last thing to do: put felt "feet" on the bottom, so they won't scratch anything up! EASY!!!!!!
Let me know if you do any, and what set you use. :)