Showing posts with label tutorial. Show all posts

Wednesday, November 24, 2010

A Thanksgiving Gift for YOU! :)

Happy Thanksgiving Eve! :D As my way of letting you know how much I appreciate you, I put together this tutorial for a Top Note Pumpkin; I taught this a couple of years ago at a Thanksgiving Stamp Camp, but have had a request - and got it cleared as OK to share with my most loyal class attendee (THANK YOU, Mary!! :) ) - for this tutorial. So, here it is, for all of you to have fun with. :) There are LOTS of photos - and don't forget, you can click on any of them to see them the size I uploaded them. :)

You will need:
--Big Shot and your acrylic cutting pads and platform (came with it, if you got your Big Shot from Stampin' Up! :D)
--6 pieces of Pumpkin Pie card stock, cut to 5-1/2"x4-1/4"
--Pumpkin Pie ink pad (doesn't matter what size!)
--sponge
--2-way glue pen
--glue stick
--bone folder
--Sweetest Stems embosslit
--Top Note die
--large oval punch
--scraps big enough for project of Chocolate Chip and Garden Green


First, cut all six pieces into Top Note die cuts. I did three at a time!


(Pause, and admire your work so far. :D )


Now, start folding; you're folding them in half the short way. (I think you know what I mean!)


Do all six!
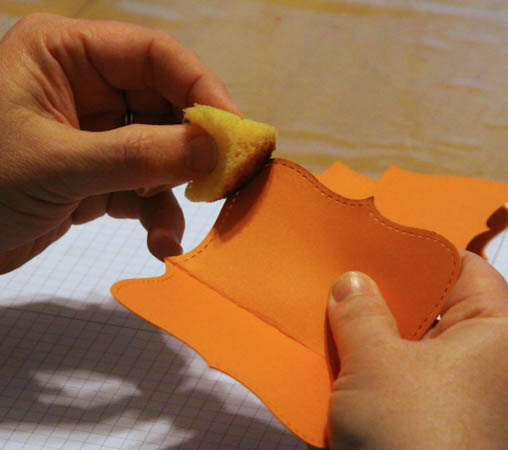


Now, take your ink and sponge, and start sponging all around the edges of a Top Note die cut.


Go all the way around. You don't want to just EDGE it, but sponge into the card stock.


Yes, do all six! If you aren't careful - which you don't need to be! :D - it won't take you too long at all. :D


Don't forget to close your ink pad up! :D


Now, take the glue stick and glue one half of a Top Note die cut.


Put glue stick on the matching half of another Top Note die cut.


Clean up any glue stick that might come out around the edges. :D


Glue three of the die cuts together. Then glue the other three together.


See? Like this!


Now, put the Garden Green card stock into the embosslit and run it through.


Take it out and separate it from the rest of the card stock - that's trash, now.


Punch out the large oval from the Chocolate Chip card stock.


Now, use the punch to take "bites" out of the oval; they should be different bites, not symmetrical.


Now, put glue stick on one half of the Top Note die cuts, and position the embosslit die cut first.


Now, put the stem on. Doesn't need to be straight or anything. :D But you can see that the stem is not all the way on the die cuts. That's the way to do it!
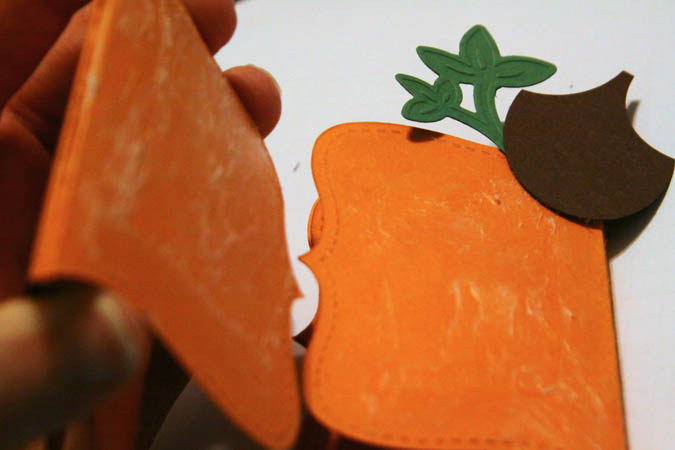


Now, put glue stick on the matching half of the other stack of Top Notes.


Put away your glue stick! :) Get out that 2-way glue pen, and put plenty of glue on one side of the total pumpkin stack. And walk away. :D


Do NOT stick the rounds of the pumpkin together until that 2-way glue is COMPLETELY dry. It's now re positionable, and you can unfold to store from year to year! (I'd put a piece of waxed paper on top of the glue....)


Play with the shape until you're happy with it! :D


I'd LOVE to hear what you think - and what you use your pumpkins for! :) Have a WONDERFUL Thanksgiving!

Thursday, March 4, 2010

It's THURSDAY!


Almost time for my crazy weekend to start. :D Am I the only one who feels like my weekends need to settle DOWN? :D

Anyway. Today's card is one I made to show my newsletter recipients a tutorial on Poppin' Pastels. If you'd like to get my newsletter, just email me and let me know! :)

It's Very Vanilla, Chocolate Chip, and Ruby Red, with Stampin' Pastels and VersaMark. That's all I used!

Sign up if you want to see HOW I did it. :D Or book a party with me - Sale-a-bration's ONLY going on until the end of this month!

OK, I'm off to finish writing my newsletter. I hope.... :D Have a WONDERFUL day - and take the time to STAMP SOMETHING!!!!!!!

Tuesday, February 16, 2010

How-To Video: Lace Border

I did it!! :) I hope you enjoy it - Bonnie S., this one's for you! :D


Sunday, December 20, 2009

A Christmas present....

Happy MONDAY, December 21!!! Only four more days until Christmas! I bet preparations are at a fever pitch at YOUR house, too. :) Try and take some time to ENJOY the lights, the scents, and the moments that will become your cherished memories, too! :)

I'm giving you this video tutorial as a Christmas gift; I have hopes of perhaps doing one more this week, but finding time when it's quiet is a little difficult. I also realize that little bits of this are off-screen - when you're shooting where you can't see the image, it's difficult!! So, if you have questions on something you can't see, please don't hesitate to ask me. :)

Merry Christmas!

Tuesday, October 27, 2009

Top Note Die Box Tutorial Available!

Please note: I'm going to try to keep this one at the top for a while. :) Just scroll down below for the newest post!

It's DONE - and it's now available to you! :)

This is the tutorial for these awesome Top Note Die boxes - I'll be the first to tell you I didn't create the idea! The tutorial is mine, though, all 12 pages - there are LOTS of pictures!

You have four options - until someone can think of one more option to suggest to me. :D

The first is the tutorial ONLY. It comes in TWO PDF files - it was too big to send all at once. As soon as I get notified by Paypal (which happens only when I'm HERE, on the computer!), I'll send you both files. It's got all my contact information on it, so you can call or email if you have questions. The cost for the file ONLY is $5.


The second is a DVD with the tutorial on it. It will be mailed to you; the additional cost is for packaging and mailing. It's $7.50.


The third choice is a KIT. There are two options for the box topper, and I will include the materials for BOTH options. PLEASE NOTE: you probably won't receive any particular Designer Series Paper - it takes just a bit over one piece of DSP for each box, so that means finishing a package completely before repeating the choice! :) I will send you the PRE-CUT pieces and the tutorial; the tutorial will come via email, the same as the first option - the same day I mail out your kit. The cost for this kit with the tutorial is $20.


The fourth choice is the KIT WITH DVD. The cost for this is $22.50; the DVD will be packaged in an envelope.


Thank you so much for all your interest in this idea! :) As I said in a few of my previous posts, I'll be doing this with a few classes throughout the year. It's just not fair to the people who pay to come to the classes for me to give the instructions away - so this is an inexpensive way for you to get the directions, WITH photos! :D

Have a WONDERFUL day! And don't forget to go STAMP SOMETHING!

Sunday, April 5, 2009

Lifesaver Gift Card Video Tutorial!

Here it is! I promised I'd try to get it done this weekend! :) If you have ANY questions, please let me know!!!


Saturday, January 31, 2009

I finally did it!

Check out my first tutorial video! :)


Monday, October 13, 2008

Happy Monday!!!


I hope you had a fantastic weekend!!! I spent it with a head cold. :) But I'm also working on big things for the Hostess Appreciation Luncheon this coming Saturday - you'll see things from that NEXT week. :D I'm not spilling the beans!!!


What I WILL do is share. :D


I made this matching card and box/bag for a dear friend for her birthday - Hi, Jan! :)


The paper is wonderful - it's the Holiday Treasures designer series paper from the Idea Book & Catalog. Jan LOVES flowers, but doesn't care much for Christmas. :D This paper has a subtle snowflake on it, but the flowers are gorgeous. So, I decided to use the paper. :D


Here's the tutorial for the treat box, from Di's blog. I've made a couple of them, actually - here's one I did for my Tennessee Stamper's Retreat Secret Sister.


Aren't they fun??? They're a great size, hold lots of chocolate ;D, and are super-simple.
Think CHRISTMAS GIFTS, everyone - they're made from card stock, so they're sturdy, and would be a great way to package a hostess gift, etc. Thanks, Di, for the great tutorial! :)
OK, I'm off - LOTS to do today!!! - but I really want to hear from you! What are you stamping???? You ARE stamping, aren't you???? ;)
Be watching for BLOG CANDY on November 1!!!! I can't wait! :D

Wednesday, July 9, 2008

Onesie Card Tutorial

As promised, here it is! :D EDITED: I was told by a friend tonight - THANK YOU, Lisa! - that this had been done as a tutorial by someone else. HERE is the link to the original tutorial by Lauren.

What you will need:


Card stock, your choice of color (I use Apricot Appeal), 4 1/4" x 11"; Extra card stock (I use Sage Shadow) in a contrasting color; 1-3/8" Circle Punch; Scallop Circle Punch; assorted stamps and inks, Paper Snips, Crop-A-Dile, three eyelets


Fold your card stock in half, folding at 5-1/2". Use a bone folder for a crisp fold! :)


Next, stamp your card stock with whatever stamp(s) you've chosen. For this example, I'm using Boho Backgrounds. (It's a great set, because it can be used for a boy OR a girl!) I'm also using Apricot Appeal ink, to coordinate with my card stock.


After you've stamped the whole card front, grab your 1-3/8" circle punch.

If you want, you can measure the exact center of the top of your card. I guesstimate. :D Punch out a HALF-CIRCLE, centering the fold in the middle.


Now, turn your card. You're going to do the same thing approximately 1 inch down from the top on both sides - you're making the arm holes. :)


Now, go to the bottom corners and punch out about a 3/4 circle - see the picture here? You just want to take the leg holes out.


When you're done with the circle punch, your card should look like this:


(PLEASE, feel free to practice your punching on scraps or even copy paper! :) It's not difficult, unless you really care about being even. I find that the next few steps really make mistakes disappear, but it's completely up to you!)


Now, using the same punch, punch a hole into your coordinating card stock. :D Be sure to leave enough space around it for the next step!


Pick up your scallop circle punch. Center that hole in the scallop circle, and punch out your shape.


It should look something like this!


Now, using your adhesive - a 2 way glue pen works GREAT for this! - attach part of it around the neck hole you punched.


See? It's easy! Just some steps to follow - and we're almost there now! :D


Using your paper snips, cut off the part of the scallop that's not attached to the card. Now, repeat on all the openings you punched. Please note! You MAY need to use your paper snips to trim a bit of the leg punch area. Don't be afraid to do so! :) Paper snips are your FRIENDS. :D


Your card should look something like this now. :)


Now, grab those paper snips again; your baby needs a waist! :D


Just angle up to about 1/4 inch below the arm holes, and cut straight in from the side about 1/2 inch. Like this, see?


Now, your card should be looking like this!


Cute, huh? :)


All that's left is to stamp any greeting you want on the inside, and set three eyelets into the bottom of the onesie.


And THIS is what your final card will look like!!!

Isn't that fun? And an EASY card!!!! If you have any questions, want to see a SCAN rather than a pic - it was a late night, can you tell? :D - please email me at poohisstampin@aol.com. I want to hear from you!

If you need any of these supplies, email me. I can't wait to hear from you!