Tuesday, January 25, 2011

SALE-A-BRATION IS HERE!!!!!


That's right! It starts TODAY! How exciting is it?!?!? For every $50 you purchase, get something FREE! Have a party - book, quick, girls' night out, whatever! - and for every $300 people purchase, you get something FREE. What could be better?!?!? Just go to MY BUSINESS SITE (click on that link :D ) to start shopping! :D Of call me at 615-497-4532 or email me at poohisstampin@aol.com to schedule your party. We've got from now until the end of March! Let's get you on the books NOW! :)

Tuesday, January 11, 2011

Same DSP package!


This one has the gold glass glitter in the middle of the poinsettia; I really like the way this turned out!

Monday, January 10, 2011

Friday, January 7, 2011

Snow flurries, anyone?


I really have enjoyed this folder! The bottom is a gift bag from IT'S IN THE BAG class. :)

Thursday, January 6, 2011

Chocolate Day!


Each year I put out the call to come celebrate chocolate! :D It's usually an inexpensive class, and a great excuse to eat chocolate. :D The spread was yummy!

We made a candy bar slider and a card! And ate chocolate. :D

Wednesday, January 5, 2011

Hostess Appreciation #2


I think a good time was had by all! Unfortunately, one of our hostesses got a horrible migraine that morning and couldn't come. But I love my hostesses, so much! Ladies, THANK YOU for sharing your lives with me. I can't imagine not having a single one of you in my life!

Tuesday, January 4, 2011

Hostess Appreciation

I know I didn't tell you very much about it this year, so here's a series of photos showing my life and studio while getting ready for it. :D


Monday, January 3, 2011

My 2010 Christmas Cards


(Don't forget you can click on the photo to get it larger!)


This is the inside. :)

Thursday, December 30, 2010

What a YEAR!!!

Slow down?!?!? What was I THINKING?!?! Goodness, it's been quite a month! And tomorrow's New Year's Eve!! And Monday, I leave on a cruise for the Bahamas! AUGH! ::Slowing breathing:::
:D

SO. I will say HAPPY NEW YEAR!!!!!!!! I'm SO grateful for all of you who have lived this year with me, who encourage me, who make me laugh AND cry. You are blessings, each and every one of you, and I appreciate you, SO much.

I am going to TRY and get up a Show-&-Tell for the time I'm gone. No explanations, no recipes, just a project each day. If you have any questions, please leave them in the comments, so I have something to write about when I come home! :D

This year we're going to try classes in a different way; if you're on my newsletter list, I'll be sending out the explanation of January's, which will be on JANUARY 22, in the afternoon. I hope you'll plan to come stamp with me!

Also, Sale-a-Bration starts JANUARY 25!!!! Stampin' Up! had some issues with their mailing selector, so I have to hand-send every mini for both Occasions and SAB. If you want one of each, PLEASE let me know - and I'll be having a drop-in mini open house when I get home, so you can pick them up and save me a stamp and envelope. :D

OK. Time to get started scheduling these posts! I hope you like what you see! :D Here's to 2011: blessings beyond measure, stronger faith in God's love for each of us, and the strength to walk that out!

Wednesday, December 8, 2010

Cake ball on a stick! :D


Hey, y'all! Another quick post - it doesn't need to be very long! :D This is from our GIFTS FROM THE ♥ class. It's a cake ball on a stick, coated with white chocolate and gingerbread person sprinkles, and then packaged quite cutely. :D

I really love the GOT TREATS stamp set that this little saying is from. :) It's a great set, even if you don't have the mini milk carton die it's created to go with!

OK, I'm outta here. If you have any questions, please don't hesitate to ask me! :D

Have a WONDERFUL day, and be SURE to take the time to STAMP something!

Tuesday, December 7, 2010

Try this!

I'm so sorry I haven't been very good lately about posting; I will try to remedy that, I promise. But for today, here's a fun idea: it's a tealight candle sleeve!

We did this for HOME & HEARTH this year; I really had fun with it! :D The set is FIRESIDE CHRISTMAS from the Holiday Mini. We stamped it on Whisper White, then colored it in with various Stampin' Write markers. We put the whole ting together wth jump rings, so it folds up easily, doesn't have to worry about scoring or anything. The fireplace is cut out, and the fire is stamped again on vellum and colored, then punched out and adhered behind the opening.

Isn't it fun? Very pretty, a very nice gift, and it just says "warm Christmas" to me. :)

OK, I'm outta here - still finishing up my Christmas cards, and baking like a mad woman for the open house this Sunday! If you're local, you're invited! I'll post the invite tomorrow. :)

Have a wonderful day, and be SURE to take the time to STAMP something! :)

Monday, December 6, 2010

Help Us Help Others!


Nashville Flood 2010: Beauty from Ashes
We really want to help a family who's in dire need this Christmas. Alas, we're not blessed with an overabundance of financial aid - but we DO have one thing: photos.
We have TWO of this Limited Edition (numbers 4 and 5) flood print available.

Here are are the particulars:
Size: 18"x24"
Metallic Paper Print
Regular price: $150
While they last, price only $50! (Please add $10 if we will need to ship to you!)
The whole fee will be given to this family! It's your opportunity to get a GREAT gift for someone (or yourself! :D), and bless us so we can bless someone else!

IF the two prints are gone before you get back to us, or if you'd like some additional choices, we also have the following available at
OUR ART GALLERY:

For a limited time only, so please act quickly!

All photos available as an Electronic Download directly from us - $15.00 (you print)
Electronic Download plus add a favorite Bible verse or quote - $20.00 (you print)

Thank you for helping us bless others. We desire to be His hands and feet in this world!

Tuesday, November 30, 2010

Fancy Favors Box, Take One! :D


Yes, we used the Fancy Favors die again for the GIFTS FROM THE ♥ class:


And we punched windows on both large sides; the other smaller side has the to-from stamp from the same set, SWEET SEASON, on it.

This is Rich Razzleberry and gold; isn't it PRETTY? I told the ladies I thought it would be fantastic to give full of Ferrero Rocher chocolates! Wouldn't YOU like to get that? I know I would.... :D

TODAY IS THE LAST DAY FOR THE INCREDIBLE ONLINE ORDERING SPECIAL! (Scroll down if you need a link!) Take advantage of the INCREDIBLE specials going on! HURRY~! It's also the last day of the fantabulous sign-up special. I'd love to have you on my team! :)

OK, gotta run. LOADS of decorating to do! :D But rest assured: I'm making the time to stamp. Are YOU? :D Only 25 days until Christmas!!!!

Monday, November 29, 2010

Fancy Favors - times TWO!

Here's another quick share from the GIFTS FROM THE ♥ class!
And YES, it's made with two dies cut from the Fancy Favors box die. It's one of my favorite dies - it's REALLY versatile! And of COURSE, we all know I ♥ My Big Shot! (Seriously. I need a bumper sticker!)

Colors are Certainly Celery and Melon Mambo. The "Season's Greetings" is from Many Merry Messages.

Let me know if you try this one - it would hold a couple dozen cookies, or be a great napkin holder, or or or! :D

OK, I'm outta here - have to work on more Christmas cards! :) Have a WONDERFUL evening, and be SURE to take the time to STAMP something! Christmas will be here SOOOOOOO SOON! WOO, HOOOOOOOOO! :D

Friday, November 26, 2010

It's the most wonderful time of the year! :D

Hello, dear friends! How was your Thanksgiving? Did you enjoy time with friends and family? Did you take the time to make memories? Don't forget to journal anything you might want to remember - especially if you're gong to scrapbook your day. :)

OK, on to today's share! This was one of the projects from GIFTS FROM THE ♥ this year. We filled the tin with a heritage candy recipe of my grandmother's, peanut butter potato candy, and then made the belly band for the tin. I think it's really pretty!

Those are the sparkle brads from the Holiday Mini! The ink was actually a bit darker on the "homemade and to die for" stamp, but that's the way it turned out in the photo. Oh, well. :D

OK, I'm outta here - cleaning and decorating today, with the cleaning being a necessarily huge (and EVIL!) job. ;)

Enjoy your weekend, my friends! Don't forget to take the time to STAMP something - Christmas is only 29 days away!

Wednesday, November 24, 2010

A Thanksgiving Gift for YOU! :)

Happy Thanksgiving Eve! :D As my way of letting you know how much I appreciate you, I put together this tutorial for a Top Note Pumpkin; I taught this a couple of years ago at a Thanksgiving Stamp Camp, but have had a request - and got it cleared as OK to share with my most loyal class attendee (THANK YOU, Mary!! :) ) - for this tutorial. So, here it is, for all of you to have fun with. :) There are LOTS of photos - and don't forget, you can click on any of them to see them the size I uploaded them. :)

You will need:
--Big Shot and your acrylic cutting pads and platform (came with it, if you got your Big Shot from Stampin' Up! :D)
--6 pieces of Pumpkin Pie card stock, cut to 5-1/2"x4-1/4"
--Pumpkin Pie ink pad (doesn't matter what size!)
--sponge
--2-way glue pen
--glue stick
--bone folder
--Sweetest Stems embosslit
--Top Note die
--large oval punch
--scraps big enough for project of Chocolate Chip and Garden Green


First, cut all six pieces into Top Note die cuts. I did three at a time!


(Pause, and admire your work so far. :D )


Now, start folding; you're folding them in half the short way. (I think you know what I mean!)


Do all six!


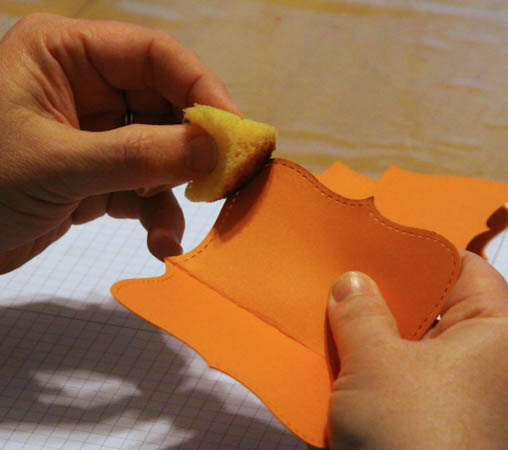
Now, take your ink and sponge, and start sponging all around the edges of a Top Note die cut.


Go all the way around. You don't want to just EDGE it, but sponge into the card stock.


Yes, do all six! If you aren't careful - which you don't need to be! :D - it won't take you too long at all. :D


Don't forget to close your ink pad up! :D


Now, take the glue stick and glue one half of a Top Note die cut.


Put glue stick on the matching half of another Top Note die cut.


Clean up any glue stick that might come out around the edges. :D


Glue three of the die cuts together. Then glue the other three together.


See? Like this!


Now, put the Garden Green card stock into the embosslit and run it through.


Take it out and separate it from the rest of the card stock - that's trash, now.


Punch out the large oval from the Chocolate Chip card stock.


Now, use the punch to take "bites" out of the oval; they should be different bites, not symmetrical.


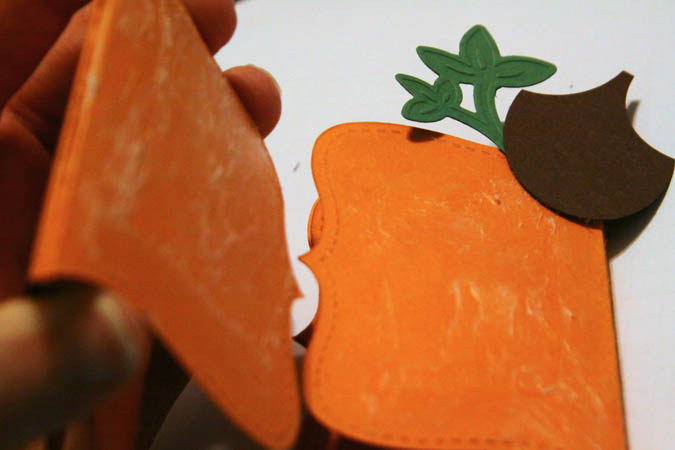
Now, put glue stick on one half of the Top Note die cuts, and position the embosslit die cut first.


Now, put the stem on. Doesn't need to be straight or anything. :D But you can see that the stem is not all the way on the die cuts. That's the way to do it!


Now, put glue stick on the matching half of the other stack of Top Notes.


Put away your glue stick! :) Get out that 2-way glue pen, and put plenty of glue on one side of the total pumpkin stack. And walk away. :D


Do NOT stick the rounds of the pumpkin together until that 2-way glue is COMPLETELY dry. It's now re positionable, and you can unfold to store from year to year! (I'd put a piece of waxed paper on top of the glue....)


Play with the shape until you're happy with it! :D


I'd LOVE to hear what you think - and what you use your pumpkins for! :) Have a WONDERFUL Thanksgiving!