Showing posts with label word window punch. Show all posts

Wednesday, August 28, 2013

Smile!

Happy Wednesday! I hope you're having a great week - are you ready for August?!? I can't believe we're almost there already!!

Today's share is one from our last Hostess Club get-together. I had a blast with this one! :D


Isn't it CUTE? It's a 6"x6" piece of Window Sheet, scored with our new trimmer. We filled it with smiley-faced gumballs, and made a big smiley face to decorate it with. It's got a Word Window Punch in Daffodil Delight on it, too, so we can use it as a table favor. Is it not too fun???? I can see doing a boys' party with a softball theme, or a Halloween with jack-o-lanterns. I could go on and on!

OK, I'm outta here. If you want to be a part of a Hostess Club, please don't hesitate to contact me! Have a wonderful day - and be sure to make the time to STAMP something!

Monday, May 14, 2012

Good Monday Morning!


Here we are, on another Monday morning. I got up early; I had something Heavenly Perspective Photography-related I needed to do, so it's still early here. I'm trying to clear the cobwebs from my brain! :)

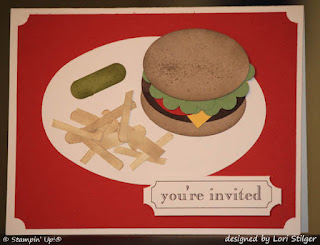
If you missed our Let's Get Punch class last week, you missed a really fun one. What do you think of my plate? :D Yes, that's a cheeseburger, fries, and pickle. :D We did it ALL with punches and ink! The "You're invited" I printed from MY DIGITAL STUDIO. (Which, by the way, is getting an incredible upgrade this fall! You won't want to miss it!!!)

Don't forget that you can see the picture better by clicking on it. :)

OK, I'm outta here! I'm having a hostess party tonight - if you want to come, let me know! There will be some awesome snacks - oh, and projects to do. :D It's the last party before the new Idea Book comes out! If you want to order a stamp set, contact me NOW and get the party-pricing shipping! :)

Have a wonderful day! Be SURE to take the time to STAMP something!

Wednesday, July 22, 2009

Happy Birthday, Dad!!

A quick share today; it's my dad's birthday, and here's the card I made for him! :) This will probably be on an upcoming Quick Card Class agenda! :) It's super simple, and very elegant, in my VERY humble opinion. :D


Card stocks: Whisper White, Taken With Teal, Basic Black

Inks: Basic Black, Sahara Sand

Stamp sets: Fifth Avenue Floral, Teeny Tiny Wishes

Accessories: modern label punch, word window punch, eyelet edge punch, dimensionals

See how quick and easy?!?!? :D This would be great in so many color combinations!!!! If you do one, I'd love to see it!!

OK, gotta jet. :) Have a WONDERFUL day, and be SURE to take the time to stamp SOMETHING!!!

Thursday, July 16, 2009

If I hurry....

I can publish this and say it's still morning! LOL!

Thank you SO much, those of you who said a prayer for me. There's lots going on IRL, and (to add to it!!!) yesterday morning I fell. In what could have been a very serious accident, God protected me! I've got some scrapes and sore muscles, but not nearly as bad as I thought I'd be the day AFTER. God is GOOD!

But to get on to what you're here for: the card. :D

I told you I'd be showing you more from the Medallion background stamp, so here's another. :D We made this Tuesday at my workshop; I just LOVE it!!


Card stocks: Crushed Curry, Whisper White, Chocolate Chip (but we used Soft Suede for Tuesday's!); More Mustard on the inside

Ink: More Mustard, Chocolate Chip

Stamp sets: Medallion background stamp, Teeny Tiny Wishes, Define Your Life inside

Accessories: white gel pen, Pretties Kit, Word Window Punch, Modern Label Punch, dimensionals, ticket corner punch inside

Isn't it CLASSY???? Single layer, so very simple - yet I think it's STUNNING. :)

OK! Lots to do today, including getting ready for the big blog tour coming up!!! I hope you have a FANTASTIC day - and please, make sure it includes taking the time to STAMP something!!! :)

Wednesday, July 15, 2009

It's being one of THOSE days already!!!!

Listen, if you pray, just say a prayer for me, OK? Things are just twisting, and I could use a little support. :) THANK YOU!

Now, on with the show!

I purchased the new MEDALLION background stamp as one of the first things when the new Idea Book went live. and I'm having a BALL with it. I have a hard time "justifying" purchasing the background stamps sometimes, but this one is REALLY versatile!! Today's sample? A Christmas card!


Card stocks: Whisper White, Basic Black, Real Red

Inks: White craft, Real Red

Stamp sets: Medallion Background, Teeny Tiny Wishes

Accessories: Embossing buddy, heat tool, white embossing powder, Modern Label Punch, Word Window Punch, dimensionals

SO simple and quick, but effective, isn't it? :D I'll be showing you more samples as the days go by, but this is it for today. :)

I hope you're having a WONDERFUL day!!!!! Don't forget to take the time to STAMP something!!! And Don't forget the new BLOG TOUR coming soon - details in the side bar!!!!

Thursday, July 2, 2009

GOOD MORNING!! It's OPEN HOUSE day!!!

If you've never been to one of my open houses, I hope you're coming today. :D We stamp, we OOH and AAH, we laugh, we eat, and we OOH and AAH some more! :D From 4-7; email me if you need directions!

Today's two samples use the new MODERN LABEL PUNCH. This first card is one I made for my dear friend and great customer, Kathy's, birthday. :D

Card stocks: Whisper White, Gable Green, Melon Mambo (NEW IN COLOR!!!)

Ink: White craft, Melon Mambo

Stamp set: Teeny Tiny Wishes - NEW!!!

Accessories: Melon Mambo Polka Dotted Ribbon, Modern Label Punch, Word Window Punch, pencil eraser, Big Shot, Top Note Die, glue dot, dimensionals

Isn't it FRESH?? I LOVE the new Melon Mambo!!!! It's glorious, so juicy! :D

This was my Father's Day card for my dad; he's a phenomenal gardener, and loves his lillies. :)

Card stocks: Whisper White, Summer Sun, Garden Green, Very Vanilla

Ink: Versamark, Garden Green

Stamp sets: Fifth Avenue Floral, Teeny Tiny Wishes

Accessories: Clear embossing powder, white embossing powder, heat tool, embossing buddy, Summer Sun, More Mustard, and Pumpkin Pie re-inkers, Aqua Painters, Modern Label Punch, dimensionals

I really like the way it turned out!

OK. I'm off to do the last-minute things for the open house! Have a wonderful day, come see me if you get the chance, and CERTAINLY take the time to STAMP SOMETHING!!!!!!!!!!!!!!!

Friday, March 20, 2009

Perfect Party Class Projects


Good morning! I hope you've had a great week! Sorry I didn't post yesterday - but I was busy working on all the projects I'm showing you today! :D
Last night was our PERFECT PARTY CLASS; we did an invitation, a gift card holder card, a table favor, a placecard favor, and a thank-you note. I used three colors - Pink Passion, Basic Black, and Whisper White - and polka dots as my theme. :)
The invitation is the Top Note pink card in the back. It's a pivot card, done with a Build-a-Brad of a cupcake. I love those little brads; they're a LOT of fun to use!! We used circle punches to create all the circles, starting with a 3/4" punch to take the center out, and working with the 1", 1-1/4", and 1-3/8" circle punches to go up in sizes. We covered a card-front sized piece of Pink Passion with the circles we wanted, then cut out the Top Note with the Big Shot. (YES, it's BACK with a vengeance for this class - four of the five projects use it!!! :D)
Then we cut a Whisper White and a Basic Black Top Note diecut, and trimmed down the Whisper White to fit onto the Basic Black mat, and stamped the Whisper White with the "you're invited" and invitation info stamps from HUGS & WISHES. Then we punched a hole for the brad to go through; when you pivot the card open around the brad, you can read the information for the party.
The next card we did was the gift card holder card - it's the Pink Passion scallop diecut card. We diecut the card and a Whisper White scallop circle; you only need a half a circle for the card. We rolled both the half-circle and the card front with the Stampin' Around Jumbo SPOT ON wheel in black, and adhered the half-circle on a diagonal on the inside of the card - JUST on the scallops, to create a pocket.
We used CRAZY FOR CUPCAKES for the front cupcake image and for the message on the inside; they're both embossed with black embossing powder, and then we colored the cupcake in with Stampin' Write Markers. We also used the ticket corner punch on the image and its mat before putting them on the front of the card.
The box with the "chain" around it is also made with the Big Shot - I just LOVE that die!!! It makes things like table favors SO easy!!! On the top of the box - which you can't see :) - there's a balloon and "just for you" from SOCK MONKEY black embossed on Gable Green; the balloon is punched out with the 1-3/8" circle punch and matted onto a Whisper White scallop circle punch. The "just for you" is punched out with the word window punch.
Next was the placecard favor; I made a template from Andrea Walford's site; she's an incredibly gifted stamper!!! I did mine with the piece of designer series paper you see above; it's from the Level 1 Hostess Paper Pack, and there were only two pieces of the POLKA DOT DSP, so I let the girls have those. :) It's fairly complicated to explain, easy to do once you get it figured out. :D We tied the ends with the organdy ribbon - the same one that was on the FRIENDS card earlier this week. We wrote our names with Stampin' Up!®'s WONDERFUL gel pen, and punched it out with the word window punch. It's simply adhered to the top!
The last project was the thank-you card; it's the black Top Note card with the Whisper White and Pink Passion circles on it. The "thank you" in a frame is from CUTE & CURLY, the stamp set that's bundled with the curly label punch. It's embossed in white on Basic Black card stock. We cut OUT the middle of the frame with SU!'s craft knife, and cut dimensional pieces to put on the back. Inside, the flower and "thanks so much" from THREE LITTLE WORDS are embossed in white, too.
The hardest part of this class? Punching and punching and PUNCHING out circles! :D It was a lot of fun, and the girls worked diligently! :)
So, that brings us to another weekend! :) I hope you have a WONDERFUL weekend, full of fun and friends and family!!!!! Get rested and rejuvenated, and you'll find that STAMPING is a great way to do that, too! :) BE BLESSED!!!

Monday, February 16, 2009

Two for One!!!!

Good Monday Morning! :) How ARE you today???? Did you have a wonderful weekend? I have so many things to post for you, I was going to double up and give you two projects today for the price of one - but Blogger's not having any of it. :D So, you'll just have to stay tuned in for tomorrow's installment!


SO. Today is number two of four layouts; it was the first one I designed, and its simplicity is part of its charm, don't you think? :D


Why, YES, I DID use my Big Shot for this! :D Again, not a single stamp was inked in the making of this layout!


Pink Pirouette Big Shot scallop circles are the mats for the pictures; That's Regal Rose card stock matting the DSP strips; the designer series paper is from the Hostess Paper Pack #2 that's ONLY available by having a $150 workshop OR placing that order yourself! (GET A BIG SHOT! I'm telling you, you'll LOVE it!!!) That butterfly (wasn't I clever to use lined DSP for a journaling box???) was also cut with the Big Shot, this time with the exclusive Beautiful Butterflies die. And everything's on a beautiful background of Chocolate Chip.

Oh, YEA! I got the second one to load up for you! You'll see why I wanted to double with this one; it's another super-simple layout, and I'm saving the big splash for the final reveal. :D


This is one of my favorite color combinations: Mellow Moss, Very Vanilla, and Always Artichoke. There's just something very restful about this combination - and I think it's great for men OR women!

Just a couple more things to tell you, and you'll have all the info you need to re-create this page at home! That is a new Jumbo Stampin' Around Wheel called FRIENDLY WORDS. It's rolled with Mellow Moss ink on the Mellow Moss card stock. The "wonderful you" is from the stamp set called - fancy this! - WONDERFUL YOU. :D It's stamped in Always Artichoke on Very Vanilla, then punched out with the word window punch; I ran the edges through the ink pad to get a little definition, and then put it on the page with dimensionals. I didn't use mats because pictures of friends can be all different sizes and colors, and we all have matting card stock. :D

OK! I'm outta here! :D Time to clean up my studio for tonight's class, the CHOCOLATE! Night! Wish you could be here - wait until you see the adorable projects we're making!!! :)

Seriously. Think about the Big Shot. You'll easily have your own workshop order, can get that paper pack for free, and more merchandise for free, too - and it's Sale-a-Bration, so you'd also earn LOTS of free SAB merchandise!! Just CLICK HERE and click on the SHOP NOW button at the top!!!

Sunday, August 24, 2008

It's Sunday night...! :)

I wanted to get a jump on this week; tomorrow is Scrapbooking classes, and Thursday I'm having another eye procedure done - so lots to fit in between now and then. :) And one of the first things I wanted to do was share the other two cards from the Advanced Techniques class with you! :)


The first one is again from TECHNIQUE JUNKIES, and the second is from my friend JOCIEL'S BLOG. Super fun!


This is called "glowing image". The angel stamp is from HOLY TRIPTYCH, a stamp set that was in last year's Holiday Mini and made it into the -08 Fall/Winter Idea Book & Catalog! I was so happy to see it - there are four stamps in the set, and they're all beautiful. :D


Anyway. Base card stock is Perfect Plum, as are the "dots" - from BASIC BACKGROUNDS - around the angel. The image is stamped on Almost Amethyst, and then layered onto Whisper White card stock. And yes, I DID use my favorite ticket corner punch again! :D


This card is ALL about the punches. :D Jociel's tutorial on the scallop edge punch made the fun DSP - Bella Rosa!!! - square frames easy. The base card stock is Very Vanilla, layered with Chocolate Chip - and the beautiful light pink is the new IN COLOR, Pink Pirouette. Well, would you look there. The ticket corner punch again. Who would have guessed??? :D
The sentiment is from WONDERFUL YOU, and stamped in Chocolate Chip on Very Vanilla, then punched out with the Word Window Punch. The flower is two 5 petal flower punches stacked, with the large punch from the Boho Blossoms flower punch of Chocolate Chip in the center. The sparkle is made by dipping a dimensional in light blue Cosmo glitter. The leaf is a small oval punched out of Kiwi Kiss - another new IN COLOR - that was folded in half, then run through our crimper. It was a FUN card to do! It's always fun to learn new uses for your punch, yes? :D
OK, I'm off. Time to go spend a little time with Kenn before the week hits. :D And tomorrow? Yeah. I'll be STAMPIN'. :D I hope YOU are taking the time to STAMP something, too!!!!!!!!!

Wednesday, February 27, 2008

Still more scrapbooking! :)


Good morning! :) I wanted to show you another set of scrapbooking pages. The color, again, on the protected pages is not quite right, but I really wanted to be sure to post these pages.
I find this Always Artichoke, Mellow Moss, and Very Vanilla combination very soothing. This would be an excellent combination for a heritage layout, or perhaps for some time in your life that's harder to scrap - a loved one who's passed away, someone who's not in your life anymore, etc.
The wheel is Stampin' Up!'s Watercolor Vine jumbo Stampin' Around wheel; the ink color is Mellow Moss. I was impressed with how well the ink showed up on the Always Artichoke.
Here's the 6x6. Same colors - and my scanner cut off the edges, but the Mellow Moss and Very Vanilla strips are not off the edge - it looks very much like the larger layout.
We used the key tag punch for the little journaling blocks, and the word window punch for the titling underneath the photo mats on the larger layout.
So, have you been stamping and/or scrapping? What have you been working on? Please forgive me if I'm slow to respond this week; the show is getting to a critical mass, opening three weeks from tomorrow night (!!!!) - and my sister and her family will be here for the next few days. I'm excited - I'll get to meet my niece for the first time!!! - but I also have three club meetings/workshops to get prepped for. :D WHEW. I'm already tired. LOL!
Have a BLESSED day! And please, TAKE THE TIME TO STAMP SOMETHING!! :)

Sunday, July 8, 2007


Grrrrr. This dumb blogger won't let me put in a TITLE!!!!!
SO. :) This was a card that I was PLANNING to do at at least three workshops this month, but the first one cancelled on me, and my best friend wanted me to use a certain set for one design, and a Christmas card for another - and my third project is one I absolutely adore, so we're gonna do it. :D So I get to share it with you!
The background is from Polka Dots & Paisley, done in VersaMark on Blue Bayou, one of the new IN COLORS. The alpha set is one of my retired ones - Stampin' Up! didn't give us any to preorder. :) The words are from Amazing to Zany, one I earned with my Sell-A-Bration sales this year. It's a 3/4" circle punch for the letters, popped up with Dimensionals. Of course, the words are punched with my wonderful, favorite Word Window Punch. :) I love all the colors that go with this new IN COLOR blue! That's Elegant Eggplant on the F, followed by Sahara Sand for R, Handsome Hunter for I, Summer Sun for E, Ruby Red for N, and Bordering Blue for D. Simple, colorful, and a great card for someone special! :)
Have a wonderful week!!!! Take time to stamp something!

Wednesday, April 25, 2007

An "Oldie But Goodie"

Good morning - barely! :) This is by request for two of my
customers - Hi, Kathy & Donna! :) It's an envelope that's been
"transformed" into an individual-sized popcorn holder. It's super-easy!
Take a business-sized envelope and seal it shut. Then, use the "Hot to Dot" wheel and wheel both sides of it - I used Real Red. Next, take decorative scissors and cut it 1/3 of the way down - so you'll have one piece that's about 1/3 of the envelope, and the other piece will be about 2/3. :D
Next, take your crimper and crimp the larger piece of the envelope.
Now, get out your "Treat Yourself" stamp set. I stamped the bag in Real Red, and the popcorn in YoYo Yellow on Whisper White card stock. The measurements for MY piece are 2-1/4"x3". Then cut mats of Real Red and YoYo Yellow; the RR dimensions are 2-1/5"x3-1/4", YYY is 2-3/4"x3-1/2". Adhere the TOP HALF of the image to the uncrimped piece of envelope. Next, ink up JUST the "Treat yourself" part of the saying stamp with a Real Red Stampin' Write marker, and stamp on YoYo Yellow card stock. Punch out with the Word Window Punch, and add an "!" with the writing tip of the marker. Then, adhere diagonally across the top of your image.
That's ALL there is to it!!!!! I do have to admit, the "Hot to Dot" wheel is one of those tricky ones for me. The edges of my wheel like to pick up too much ink!!! I found today that if I just hold it steady and push it quickly, I don't have as much trouble with little lines. :)
I would LOVE to hear from you, if you decide to try this! Leave me a comment, send me an email, send me a pic!! I feel like I'm whistlin' in the dark over here in my little corner of the world. :D